


🎓 First steps with NoesisGUI and Unity

This tutorial covers the basics of using NoesisGUI within Unity. NoesisGUI entirely replaces Unity UI delivering a robust, performant UI framework. You will learn how to start editing the samples included in NoesisGUI package and how to create new games from scratch. NoesisGUI is deeply integrated with Unity; XAMLs appear as native resources that directly use assets imported by Unity like Textures, Fonts, VideoClips and AudioClips.
With the release of NoesisGUI 4.0, we have introduced Noesis Studio, completely replacing Microsoft Blend and fully integrated inside Unity to provide a seamless, native WYSIWYG editing experience. It is strongly recommended that you read the Noesis Studio Getting Started guide to learn about this new workflow, along with the rest of the tutorials to familiarize yourself with the basic concepts of XAML and the Noesis architecture.
NoesisGUI is fully compatible with all major Unity rendering pipelines across recent Unity versions. The table below summarizes the supported Unity versions and their compatibility with the Built-in, URP, and HDRP pipelines:
| Unity Version | Built-in | URP | HDRP |
|---|---|---|---|
| 2020.2 - 2023.x | ✅Compatible | ✅Compatible | ✅Compatible |
| Unity 6.X | ✅Compatible | ✅Compatible | ✅Compatible |
What's new in 4.0
- Noesis Studio Integration: Microsoft Blend is no longer required. Noesis Studio is now fully integrated directly inside Unity, providing a modern, native interface for designing your UIs.
- Streamlined Installation (.tgz & Scoped Registry): The plugin is now distributed as a tarball (.tgz) file that can be installed directly through the Package Manager without extracting. Licensees can also use our new Scoped Registry for effortless updates.
- Explicit Asset Dependencies: Introduced the [AssetDependency] attribute to cleanly declare code dependencies for XAML assets, custom shaders, and controls, ensuring reliable player builds.
- All new features included in 4.0 Core are also available.
What's new in 3.2
- Added support for Rive assets.
- Support for disabling Hot-reloading from Settings panel.
- Legacy Input System is no longer necessary.
- Added tracking device actions for XR to Input Actions Asset.
- Added World Space UI property to View.
- Support for editing XAML files in Visual Studio Code.
- Vulkan renderer is now supported on Windows and Android platforms.
- Unity 2023.2+ is required for WebGL.
- All new features included in 3.2 Core are also available.
What's new in 3.1
- NoesisGUI is now a package that must be installed using the Package Manager. The previous package, located at 'Assets/NoesisGUI' must be deleted before installing the new version.
- XAML assets are now implemented using a Scripted Importer. This means that we no longer need the corresponding .asset file for each .xaml. You must delete all .asset files belonging to .xaml resources if you are upgrading your project. References to XAMLs from current views must also be recreated. Since 3.1.1 this step is performed automatically.
- Fonts are also implemented using a Scripted Importer. In this case we are overriding the default font importer used by Unity. Same as with XAMLs, you must delete all .asset files belonging to .ttf resources. Since 3.1.1 this step is performed automatically.
- NoesisSettings.asset has been deprecated and must be removed. When first installing NoesisGUI 3.1, a new Noesis.settings.asset will be created. This new asset is very similar to the legacy one but no longer needs to be stored inside a Resources folder.
- Sprites are now supported in DataContexts and accessible to ImageSource properties in XAML using data-binding. See our Inventory sample.
- Implemented gamepad events using the new Input System Package. Note that for keyboard, mouse and touch we still need the legacy Input System.
- All new features like Videos, Blending Modes and Shaders included in 3.1 Core are also available for Unity. See our examples VideoEffect and BrushShaders.
- Hot-reloading while in Play mode is now always enabled.
Installation
The first step is downloading the latest version of the Unity package from our website. The package is distributed as a compressed tarball file (.tgz).
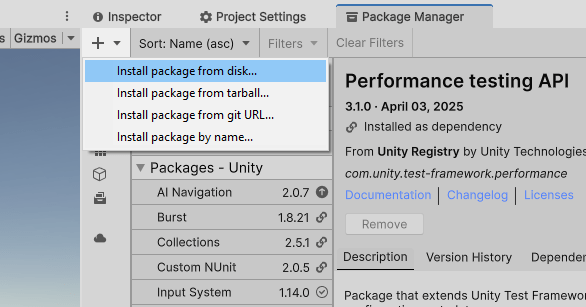
Next, open Unity's Package Manager and install the NoesisGUI package using the "Install package from tarball..." option, selecting the downloaded .tgz file.
Note
For NoesisGUI Licensees, we also offer a Scoped Registry to streamline the installation and update process directly from the Unity Package Manager.
Once the installation is complete, a shiny new Welcome window will automatically appear. This window presents important information about the newly installed version of NoesisGUI, highlighting all the latest features, improvements, and fixes in the Release Notes.
If this is your first contact with Noesis, we strongly recommend importing all the examples included in the package and reading the provided documentation. You can conveniently import these samples directly from this new Welcome window, or alternatively, through the standard Unity Package Manager interface.

Examples
Within the installed package, we provide several working samples, each with its corresponding scene file (.unity) and a Noesis Studio (.noesis) project. For example, the HelloWorld sample includes the scene located at Hello World/HelloWorld.unity and the Studio project file located at Hello World/HelloWorld.noesis.
Simply double-clicking on the Noesis Studio project asset within the Unity Editor will automatically open the project in a new window, allowing you to instantly inspect, edit, and preview the UI.

Configuring NoesisGUI
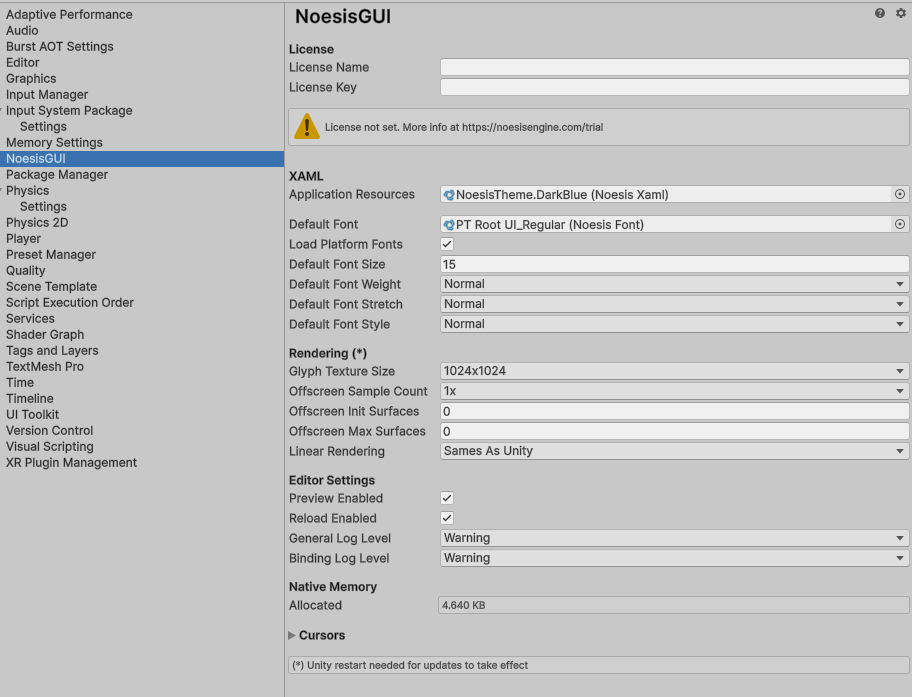
Clicking on the Unity menu option 'Tools -> NoesisGUI -> Settings' will open an inspector window that displays global options for NoesisGUI. This same window is also available in Project Settings under the NoesisGUI category. For more details about a specific option, hover the mouse over it to see a helpful tooltip description.
Note
Settings, by default, are stored at 'Assets/Noesis.settings.asset'. Please move this file to a different folder that better suits your project layout.
The Application Resources field in this settings window is especially important: it replaces the traditional App.xaml used in WPF applications. Since Unity does not use the Application class, any global resource dictionaries that would normally go into App.xaml must be referenced here instead. This includes the default Theme, or any custom resources your project needs globally. If you are migrating legacy WPF projects and using its default structure, make sure to move the merged dictionaries from App.xaml into the Application Resources section manually.
More information about available Noesis licenses can be found in the Licensing documentation.
Noesis Studio

Noesis Studio is our modern, fully integrated native editor for designing XAML-based interfaces, completely replacing the need for Microsoft Blend. Any changes performed in Noesis Studio appear immediately in the Unity Editor, even in Play mode. This seamless workflow allows for extremely quick iterations while designing and testing user interfaces.
Note
For getting started with our editor, we recommend reading our Noesis Studio Tutorial.
Opening the project
To access the UI project for your game or application, you can use the Unity menu option 'Tools -> NoesisGUI -> Open Studio Project', or simply use the convenient keyboard shortcut CTRL + ALT + N.
The first time you select this option or use the shortcut, NoesisGUI will automatically create and initialize a new Studio project for you.
Note
There is only one Noesis Studio project per Unity project. The project file (.noesis) is placed at the root of your Unity project folder (at the same level as your generated C# solution, right outside the 'Assets/' directory).
By keeping a single Studio project alongside your Unity project, all your UI resources from the 'Assets/' folder are easily accessible and automatically kept in sync.
During this initial creation, a global resources dictionary is also automatically generated at 'Assets/GlobalResources.xaml'. This dictionary is where Noesis Studio will store its global resources. It is highly recommended that you assign this file to the Application Resources property in the NoesisGUI Settings panel to ensure your global styles and resources are properly linked and loaded at runtime.
Assets
XAML assets
When you drag and drop XAML files into your project 'Assets/' folder, Unity will automatically generate a NoesisXaml asset for each file. These assets come with a thumbnail preview and a dedicated preview window, making it easier to identify and work with your UI files directly within the Unity Editor.
Note
'Window' root elements are not supported by NoesisGUI in Unity, as the windowing system is provided by the Unity engine itself. Instead, we recommend using 'Page', 'UserControl', or any 'Panel' class as the XAML root.
Additionally, the 'Application' class is not supported. This means that the 'App.xaml' file typically used in WPF environments cannot be used as-is. If you have a merged dictionary defined in 'App.xaml', you should manually add it to the Application Resources property found in the Noesis Settings panel.
You can also create a few XAML snippets directly from the 'Tools -> NoesisGUI -> Create' menu.

Dependencies
It is extremely important that every XAML file declares its dependencies correctly. When building a standalone player in Unity, only the assets explicitly referenced will be included in the final build. If dependencies are not properly linked, required resources (such as fonts, textures, or controls) may be excluded, resulting in missing or broken UI elements at runtime.
While the import process automatically injects dependencies for resources like Textures, AudioClips, VideoClips, and Fonts, dependencies for code-backed assets (like UserControls and Shaders) must be explicitly indicated in NoesisGUI 4.0.
This is achieved by linking a C# class to its corresponding Noesis asset using the [AssetDependency] attribute.
The attribute can be used without parameters (auto mode). In this case, NoesisGUI automatically resolves paths for scripts located inside the 'Assets/' directory using file naming conventions:
- Control.xaml.cs automatically links to Control.xaml.
- TintEffect.cs automatically links to Tint.noesiseffect.
- TintBrush.cs automatically links to Tint.noesisbrush.
For example, our UserControl sample uses auto mode to link the class to its XAML:
[AssetDependency]
public class NumericUpDown : UserControl
If your asset is located inside a package (e.g., starting with Packages/) or does not follow the naming conventions, you must specify the full explicit path. You can also apply the attribute multiple times if a class depends on more than one asset.
[AssetDependency("Packages/com.noesis.noesisgui/Shaders/Saturation.noesiseffect")]
public class SaturationEffect : ShaderEffect

[AssetDependency("Packages/com.noesis.noesisgui/Shaders/InnerShadow.noesisbrush")]
[AssetDependency("Packages/com.noesis.noesisgui/Shaders/OuterShadow.noesisbrush")]
public class BoxShadow : FrameworkElement
Once a type has its dependencies specified using the [AssetDependency] attribute, those dependencies are automatically propagated. This means that every time that type is used inside a XAML file, its declared dependencies will be automatically added to that XAML.
For example, if your custom UserControl class declares a dependency on its own XAML file, any other XAML that instantiates your UserControl will automatically inherit the dependency to the control's underlying XAML.
To inspect the list of dependencies for a given XAML file, simply click on the asset in the Unity Editor to open its inspector panel.
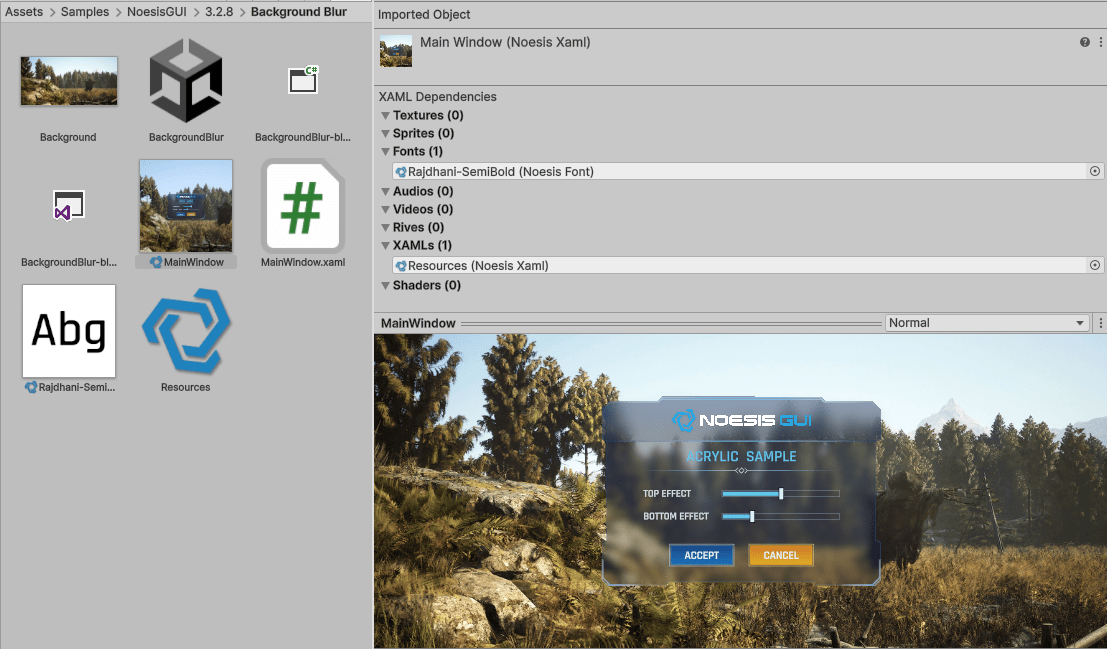
Just in case you need to add extra dependencies to your XAML, such as resources used only from code in ViewModels, we provide the extension property Xaml.Dependencies.
The specified URI can be either relative to the XAML file where the dependency is defined or an absolute URI.
Note
We generally do not recommend setting dependencies manually. This is a legacy feature and is rarely needed.
<UserControl
  xmlns="http://schemas.microsoft.com/winfx/2006/xaml/presentation"
  xmlns:x="http://schemas.microsoft.com/winfx/2006/xaml"
  xmlns:noesis="clr-namespace:NoesisGUIExtensions"
  x:Class="Localization.MainWindow"
  FontFamily="./#Oxygen, ./#FontopoNIHONGO"
  Foreground="#FF488EB5">

  <noesis:Xaml.Dependencies>
    <noesis:Dependency Source="Language-en.xaml"/>
    <noesis:Dependency Source="Language-fr.xaml"/>
    <noesis:Dependency Source="Language-jp.xaml"/>
  </noesis:Xaml.Dependencies>

</UserControl>
Theme
A Theme provides default styles for all UI controls, serving as a solid starting point to create your own game styles.
It is configured in the NoesisGUI Settings menu, under the Application Resources entry. By default, our Noesis Theme, located at Packages/com.noesis.noesisgui/Theme, is used.
Note
App.xaml is not used by Unity. Instead, Application Resources are set in the NoesisGUI Settings.

Language Server
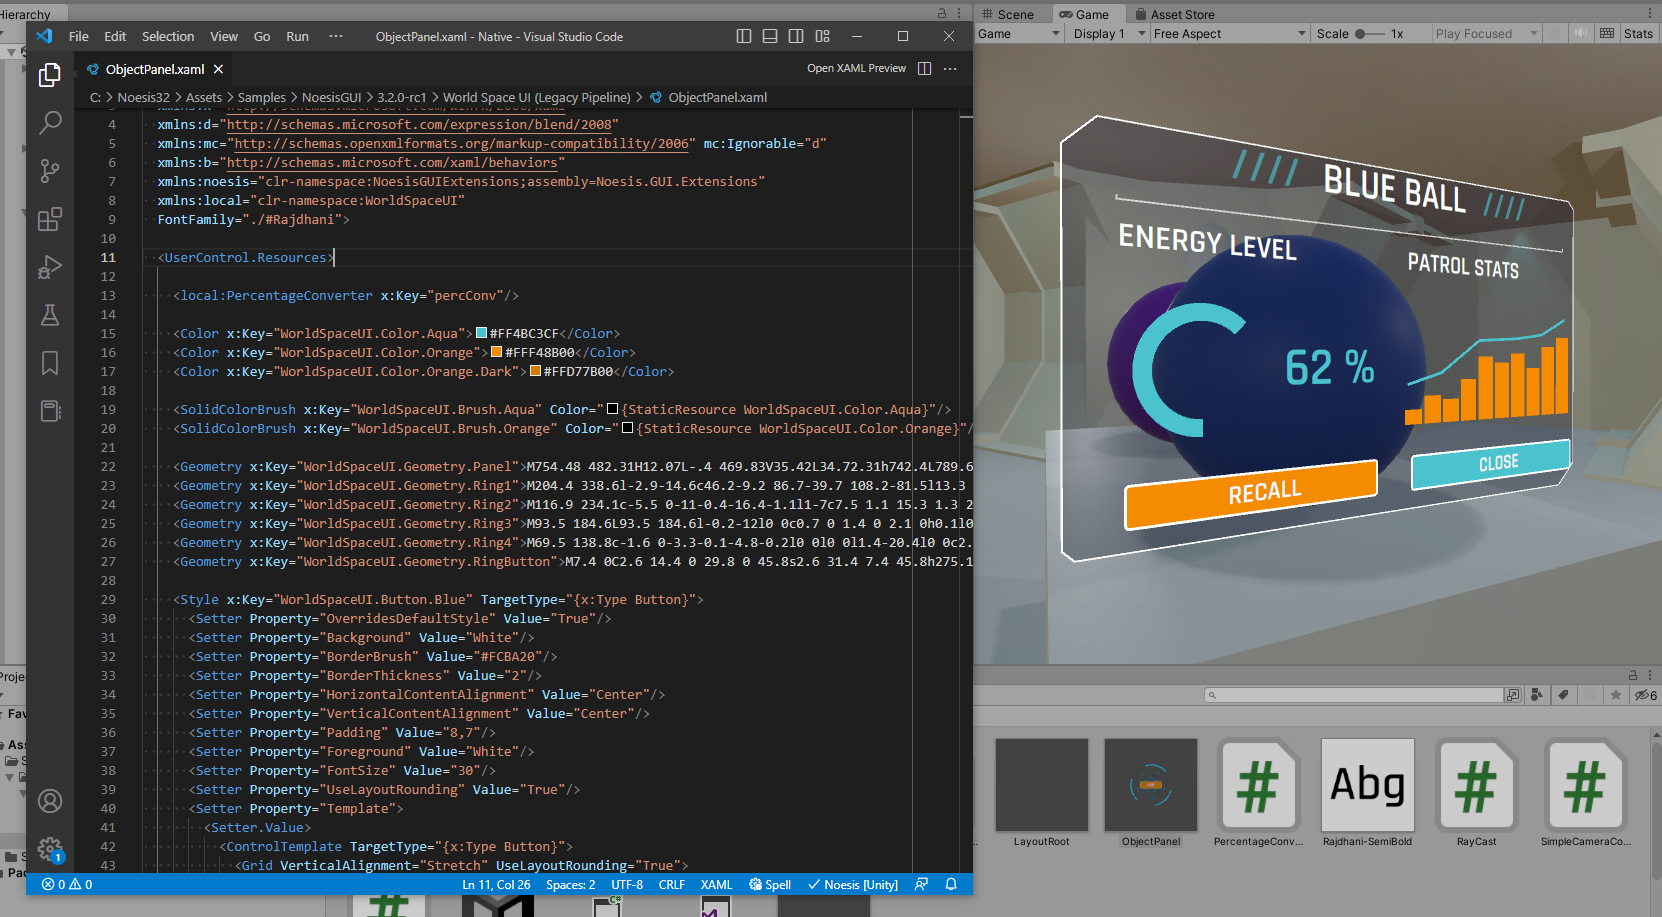
A Visual Studio Code extension is available to provide a rich editing experience when working with XAML.
This extension enables language server features such as autocompletion, type information, and error highlighting, while the Unity Editor is open.
Texture assets
Images used inside XAMLs generate a dependency to the corresponding Unity texture asset. The texture imported by Unity is directly consumed by NoesisGUI. This means that all settings available under Import Settings are respected.
If your images include alpha, make sure to:
- Set Alpha Source to Input Texture Alpha
- Uncheck Alpha is Transparency
- Add the label Noesis to the texture to enable automatic conversion to the premultiplied-alpha format required by Noesis
Note
If the Noesis label is not added to a texture, Noesis will emit a runtime warning each time that texture is used

Sprites
Sprites in Unity can be used with NoesisGUI just like regular images. If a sprite is part of a sprite atlas, it can still be referenced normally in XAML, as NoesisGUI reads the underlying texture asset.
Additionally, you can expose objects in your view models and bind them directly to Image.Source.
This makes it easy to integrate your existing Unity workflows with Noesis-based UIs.
public class Item
{
    public UnityEngine.Sprite _icon;
    public UnityEngine.Sprite Icon { get => _icon; }
}
This Sprite property can be consumed by any ImageSource property in XAML using data-binding:
 <DataTemplate x:Key="InventorySlot">
   <Grid Margin="5" Background="Transparent" ToolTip="{Binding Item.Description}">
     <Border BorderThickness="2" BorderBrush="{StaticResource OrangeBorder}"
       Background="{StaticResource RadialBackground}" CornerRadius="4"/>
     <Image Source="{Binding Item.Icon}"/>
   </Grid>
</DataTemplate>
The Inventory sample included in the package demonstrates how to use sprites and atlases effectively to reduce the number of draw calls, helping you build more performance-efficient interfaces.

AudioClip assets
AudioClips are natively supported by NoesisGUI through the Behaviors system.
Any clip used in a PlaySoundAction is automatically added as a dependency of the XAML, ensuring it is properly included in the Unity build.
<Button Content="START" Command="{Binding StartCommand}">
  <b:Interaction.Triggers>
    <b:EventTrigger EventName="GotFocus">
      <b:PlaySoundAction Source="AudioSlide.mp3" Volume="0.5"/>
    </b:EventTrigger>
    <b:EventTrigger EventName="Click">
      <b:PlaySoundAction Source="AudioClick.mp3" Volume="0.8"/>
    </b:EventTrigger>
  </b:Interaction.Triggers>
</Button>

VideoClip assets
VideoClips can be played using the MediaElement control.
Just like AudioClips, they are automatically detected and added as XAML dependencies, ensuring they are correctly included in the Unity build.
<Grid x:Name="LayoutRoot">
  <Border>
    <Border.Effect>
      <noesis:TintEffect/>
    </Border.Effect>
    <MediaElement Source="Particles.mp4" Stretch="UniformToFill" LoadedBehavior="Manual">
      <b:Interaction.Triggers>
        <b:EventTrigger EventName="Loaded">
          <noesis:PlayMediaAction/>
        </b:EventTrigger>
        <b:EventTrigger EventName="MediaEnded">
          <noesis:StopMediaAction/>
          <noesis:PlayMediaAction/>
        </b:EventTrigger>
      </b:Interaction.Triggers>
    </MediaElement>
  </Border>
</Grid>

Fonts assets
Similar to XAMLs, each time you drop a .ttf, .otf, or .ttc file into your Unity project, it is automatically imported by NoesisGUI.
An editor window is provided to display key attributes such as Family, Weight, Style, and Stretch, along with a real-time render preview of the font.

Shader assets
As described in the Shaders Tutorial, NoesisGUI can be extended with custom shaders using Effects and Brushes.
In Unity, shaders for effects are defined in .noesiseffect files, while shaders for brushes are defined in .noesisbrush files. Both formats describe the shader in HLSL.
In NoesisGUI 4.0, dependencies between C# shader classes and their underlying HLSL asset files must be declared using the [AssetDependency] attribute.
When using auto mode [AssetDependency] inside your 'Assets/' folder, NoesisGUI resolves the shader file path based on the class name suffix:
- A class ending in Effect (e.g., TintEffect.cs) automatically resolves to Tint.noesiseffect.
- A class ending in Brush (e.g., TintBrush.cs) automatically resolves to Tint.noesisbrush.
If your shader asset is located inside a package or does not follow these naming conventions, specify the full explicit path instead.
Shaders are loaded in C# using the CreateShader function. This function should be called once to initialize the shader instance, followed by SetShader to apply it:
[AssetDependency("Packages/com.noesis.noesisgui/Runtime/API/Shaders/Noise.noesiseffect")]
public class NoiseEffect : ShaderEffect
{
    private static NoesisShader Shader;

    public NoiseEffect()
    {
        Shader ??= CreateShader();
        SetShader(Shader);
        SetConstantBuffer(_constants);
    }
}
The examples VideoEffect and BrushShaders can be used as guides to implement your own shaders.

Rive assets
Rive assets (.riv) are supported by NoesisGUI starting from version 3.2. These assets are used through the RiveControl, which provides access to state machine input values and triggers directly from XAML or code-behind.
An example is included in the package, fully created with Rive, demonstrating integration and animation control.

Data binding
The recommended way to interact with the UI is through DataBinding between XAMLs and DataContexts in code. Unity provides additional flexibility by allowing MonoBehaviours to be used as DataContexts. This means you can assign and edit the DataContext directly in the Unity Inspector, making the workflow more intuitive and integrated.
The DataBinding example included in the package is a great use-case demonstrating this approach.

Another useful extension included in our examples is NoesisEventCommand, which connects a UnityEvent with a NoesisGUI ICommand. This allows you to bind XAML events directly to MonoBehaviour methods via the Unity Inspector, streamlining the interaction between UI and code.
The Button example demonstrates this integration in action.

Input Actions
All Views provide a default asset with actions for navigation events. You can create a new asset and assign it to the View using the Actions Asset property to customize how input interactions are handled.

The following properties are also available on each View:
- Action Map: Set of actions used by the view and enabled by default.
- Action Repeat Delay: The initial delay (in seconds) before a repeated action begins.
- Action Repeat Rate: The interval (in seconds) at which a repeated action continues.
- XR Tracking Origin: Transform representing the real-world origin for tracking XR devices.
- Matched Actions: Displays a list of input actions currently bound to this view. Actions highlighted in red are not mapped to any input action and will not respond during runtime.
Rendering
The MonoBehaviour responsible for rendering XAMLs is NoesisView. You must attach this component to a GameObject. When attached to a Camera, the user interface will render as an overlay layer on top of the camera's output.
To set up UI rendering to a camera, simply drag and drop a XAML asset into the Scene View. You can also drag and drop XAMLs directly into the Hierarchy Window to create a new UI object in the scene.

To display and interact with the user interface, you must enter Play mode. While in Play mode, the NoesisView preview window will display performance stats such as frame rate and memory usage, providing valuable insights to help you optimize your interfaces efficiently. This real-time feedback makes it easier to identify performance bottlenecks and ensure a smooth user experience.

Post-processing
Legacy Pipeline
By default, camera post processing effects are applied to the UI. In case you don't want this to happen, you need to create a new camera to render NoesisGUI. This camera must have a larger 'Depth' value and must set 'Clear Flags' to 'Don't Clear'. You must also make sure the 'Culling Mask' is set to 'Nothing' to avoid rendering 3D elements with this camera.
UNITY BUG
When using Camera Stacking (several cameras rendering to the same render target), make sure the camera rendering the UI has the properties 'Culling Mask' and 'HDR' respectively set to 'Nothing' and 'Off'. This will avoid a bug in the latest versions of Unity.
Universal Pipeline
In the Universal Render Pipeline (URP), camera post-processing effects are applied to the UI. If you want to render the UI after post-processing, you need to use Camera Stacking. We recommend the following steps:
- Create a new camera only for the UI and attach a Noesis View component to it. Set 'Render Type' to 'Overlay' and 'Culling Mask' to 'Nothing'. Make sure 'Post Processing' is disabled on this camera.
- Create another camera for post-processing. Set 'Render Type' to 'Overlay' and 'Culling Mask' to 'Nothing'. Enable the 'Post Processing' checkbox.
- Create an empty GameObject with a Volume component to define your post-processing effects.
- Attach both cameras to the Stack section of the Main Camera. The 'UI camera' must be the last in the list to ensure it renders after post-processing.

Note
In URP, Noesis View also exposes an 'Injection Point' property that controls when the UI pass is rendered. However, changing this property may not work consistently across all platforms, so we recommend using the steps described above for best compatibility.
High Definition Pipeline
In the High Definition Render Pipeline (HDRP), camera post-processing does not affect the UI by default. This behavior can be changed using the 'Injection Point' property exposed by the Noesis View component.

Render to texture
In some scenarios, you may want to render the user interface to a texture instead of directly displaying it on the screen or through a camera. NoesisGUI supports this workflow by allowing you to attach a NoesisView component to any GameObject that is not a camera.
When NoesisView is attached to a non-camera object, its Render Mode automatically switches to Render Texture. This is reflected in the Render Mode property of the component. In this mode, a new property called Target Texture becomes available, allowing you to specify the Render Texture where the UI should be rendered.
To use this feature, create a Render Texture asset and assign it to the Target Texture field in the NoesisView.
Note
We recommend creating the texture using 'Tools -> NoesisGUI -> Create -> Render Texture' to work around a Unity bug when using linear rendering. Ensure the created render texture has a stencil buffer enabled. NoesisGUI relies on the stencil for masking UI elements.

The texture must also be used by a material assigned to the object's Mesh Renderer to display the UI on screen. If you want the UI rendered in the texture to be interactive, the GameObject must have a MeshCollider component. This allows NoesisGUI to perform hit testing by projecting mouse or touch events onto the texture's surface.

The Widget3D example included in the package demonstrates how to use Render Texture to display UI controls within 3D scenes.

Rendering on demand
By default, in Render Texture mode, the property Continuous Rendering is disabled to render only when changes happen. This can bring significant performance and power savings.
The Continuous Rendering property is not available when rendering to a camera. In this case, a different approach must be followed. The External Update property of NoesisView must be enabled to activate manual updates. The Camera component must be disabled and manually repainted using the following code:
public class Redraw : MonoBehaviour
{
   void Update()
   {
      NoesisView view = gameObject.GetComponent<NoesisView>();
      view.ExternalUpdate();

      if (view.NeedsRendering)
      {
         Camera camera = gameObject.GetComponent<Camera>();
         camera.Render();
      }
   }
}
World-Space UI
The user interface can also be rendered directly in 3D, without using render-to-texture. This is the recommended method when you want the UI to be occluded by objects in the 3D scene, or when aiming for the highest visual quality in Virtual Reality.
Note
The property 'World Space UI' must be enabled in the view. It is also recommended to disable PPAA and rely on GPU-based anti-aliasing for better results.
You can place multiple UI elements floating in 3D space, each one attached to a GameObject by using the Noesis World UI component.

The following properties are exposed in this component:
- View: The Noesis View used to render the specified XAML.
- XAML: The UI placed in the GameObject position.
- Container: The Name of the Panel container (in the View) where the specified XAML will be inserted.
- Scale: Allows scaling UI pixels to scene units.
- Offset: Adjust UI position relative to the GameObject.
- Center: If enabled centers the UI in the GameObject position.
The Main View must contain a XAML with a container where child UIs are added. The name of the container is specified in the Noesis World UI component. It can be located anywhere in the XAML. For example:
<Grid xmlns="http://schemas.microsoft.com/winfx/2006/xaml/presentation"
  xmlns:x="http://schemas.microsoft.com/winfx/2006/xaml">
  <Canvas x:Name="Root"/>
</Grid>
Note
There is an example in the package, 'World Space UI', showing how to setup a basic scene with 3D UI. It is also compatible with XR if the plugin 'XR Plugin Management' is installed.

Hit Testing
In some situations, it is necessary to check whether the mouse is hovering over or has clicked on an element in the UI. This can be achieved using the HitTest method available through the VisualTreeHelper class.
using UnityEngine;
using Noesis;

public class HitTestSample : MonoBehaviour
{
    Visual _root;

    void Start()
    {
        NoesisView view = GetComponent<NoesisView>();
        _root = (Visual)VisualTreeHelper.GetRoot(view.Content);
    }

    void OnMouseDown()
    {
        Vector3 mousePos = Input.mousePosition;
        Point point = _root.PointFromScreen(new Point(mousePos.x, Screen.height - mousePos.y));
        HitTestResult hit = VisualTreeHelper.HitTest(this._root, point);
        if (hit.VisualHit == null)
        {
            // No UI element was hit

            // ...your code here
        }
    }
}
Platform Notes
iOS
For now, Bitcode is not supported and it must be disabled. We recommend disabling it at the project level to affect all targets in Xcode.

WebGL
Unity 2023.2+ (Emscripten 3.1.38) is required for using NoesisGUI with WebGL.
