📘 Noesis Project Files
🏘️ NoesisGUI ▸ 🏠 Noesis Studio ▸ 📘 Noesis Project Files
Overview

Every Project created from the Noesis Studio Launcher automatically creates a .noesis file in the root of the designated Project directory.
This .noesis file not only serves as the file-system anchor for all associated Project files, but also offers many layers of advanced Project customization options, which can be added, modified, or removed, by simply opening the .noesis file in any text editor.
Note
To avoid breaking any content, it is not recommended to move a Project's .noesis file to a different location without its associated .xaml files, as this could prevent a Project from correctly displaying and functioning within Studio.
Resolution List Customization
The list of default resolutions available within Noesis Studio's 📘 Stage Preview Toolbar can be replaced with an infinite amount of custom resolutions, on a per-Project basis.
Adding custom resolutions can be achieved by opening the Project's .noesis file in any text editor, and adding a <DesignSizes> section which contains the list of new sizes to make available for selection within Studio:
<Project>

   <Assembly> MyProject </Assembly>

   <DefaultDataNamespace> MyProjectData </DefaultDataNamespace>

   <StartupDocument> MainPage.xaml </StartupDocument>

   <DesignSizes>
      <DesignSize Width="520" Height="260"/>
      <DesignSize Name="MyCustomDeviceResolution" Width="640" Height="360"/>
      <DesignSize Name="4:3" Width="800" Height="600"/>
      <DesignSize Name="WQHD" Width="3440" Height="1440"/>
   </DesignSizes>

</Project>
Each custom resoluton features a manually-set Width and Height value. As the orientation is directed by the Stage Preview Toolbar's orientation buttons, the Width or Height can be written in any order within each individual <DesignSize> line.
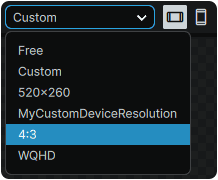
Each custom resolution can also feature a custom Name to display in the dropdown menu. Adding a Name is optional, and if none is provided, the name displayed in Studio will correspond to the declared Width x Height.
Once the customized .noesis Project file has been saved, and Noesis Studio is closed and re-opened, custom resolutions will then be available to select from within the application:
Filesystem Features
Hiding Assets in Studio
The contents of the 📘 Assets Panel can be customized to prevent any number of folders and/or files from being displayed and accessible to users within Noesis Studio's interface.
Note
Although folders and/or files can be hidden from Studio's menus, what is rendered on-Stage and in-Engine is not impacted. Therefore, if an asset is referenced in XAML, it will still display on the 📘 Stage in Studio, and in-Engine at runtime.
These exclusions can be configured by opening the Project's .noesis in any text editor, and adding an <IgnoredFiles> section:
<Project>

   <Assembly> MyProject </Assembly>

   <StartupDocument> MainPage.xaml </StartupDocument>

   <IgnoredFiles>
     <Ignore>*</Ignore>
     <Allow>HUD/</Allow>
     <Ignore>HUD/Icons/</Ignore>
     <Allow>HUD/Icons/Crosshair.png</Allow>
   </IgnoredFiles>

</Project>
Note
The order in which folders or files are listed impacts what is shown ('allowed') and what is hidden ('ignored'). In a top-to-bottom order, what is declared lower the list, can overwrite what is written prior to it in the document.
In the example above, through the * wildcard, the entire contents of the root Assets directory are hidden, except for the 🗀 HUD folder which remains visible. However, within the 🗀 HUD's 🗀 Icons folder, all assets are hidden, with the exception of 🗋 Crosshair.png which remains visible.
Assets Directory Constriction
In certain circumstances, a Project's architecture may benefit from intentionally reducing the scope of the directories visible in Studio's Assets Panel.
This can be configured by opening the Project's .noesis in any text editor, and adding an <AssetsRoot> section containing the path to the directory to be displayed:
<Project>

   <Assembly> MyProject </Assembly>

   <StartupDocument> MainPage.xaml </StartupDocument>

   <AssetsRoot> Folder/SubFolder/Assets </AssetsRoot>

</Project>
Setting Resource Type Defaults
By default, to provide maximum flexibility throughout the creation process, all Resources created within Studio are set to be 📘 Dynamic Resources.
In certain circumstances, this can however be changed to default to using 📘 Static Resources by opening the Project's .noesis file in any text editor, and adding a <PreferStaticResource> section:
<Project>

   <Assembly> MyProject </Assembly>

   <StartupDocument> MainPage.xaml </StartupDocument>

   <PreferStaticResource> True </PreferStaticResource>

</Project>