


📘 View Toolbar
🏘️ NoesisGUI ▸ 🏠 Noesis Studio ▸ 📘 View Toolbar
Overview
The View Toolbar allows the preview of the currently-open document to be manipulated in zoom level and position on the 📘 Stage, and allows creators to customize their level of focus on different parts of the interface being worked on.
Tools
A variety of tools are offered to allow full customzation in how an open document is displayed in the visual editor:
Pan Tool
Selecting the Pan Tool allows the repositioning of the document within the viewport, across both the horizontal and vertical axis.
The Pan Tool can also be activated by pressing H on the keyboard.
Once the Pan Tool is activated, the 📘 Stage can be moved in any direction by clicking-and-dragging the mouse within the viewport.
The Pan Tool also features a handy 'temporary activation' feature that can be engaged by holding down on MiddleMouse whilst dragging the mouse in any direction in the viewport.
Zoom Tool
Selecting the Zoom Tool allows zooming in or out of the 📘 Stage.
The Zoom Tool can also be activated by pressing Z on the keyboard.
By default, clicking anywhere within the viewport will zoom in.
With the Zoom Tool active, zooming out can be performed by pressing Alt (Hold), then clicking anywhere within the viewport.
Alternately, zooming can be performed at any time without activating the Zoom Tool, by simply scrolling up and down the MouseWheel, to zoom in and out respectively.
Both of these methods use the position of the cursor within the viewport as the 'focal point' of the zoom operation.
Furthermore, the Ctrl (Hold) + + and Ctrl (Hold) + - shortcuts can be used at any time to zoom in or out respectively. In this method however, instead of being dictated by the cursor's position, when a zoom is performed via keyboard shortcuts alone, the center of the viewport is used as the 'focal point' of the zoom operation.
Across all methods, the zoom will increase or decrease by one increment equivalent to 10% of the current dimension of the 📘 Stage.
Reset Zoom
Reset Zoom allows resetting the 📘 Stage to 100% of its size.
For example, in the case of 1920x1080 Page, resetting the zoom level will display the Stage at its native 1920x1080 size.
Resetting the zoom can also be activated by pressing Ctrl (Hold) + R on the keyboard.
Fit All
Fit All allows setting the 📘 Stage to fill to the maximum size available in the viewport.
The Stage can also be set to fill the viewport by pressing Ctrl (Hold) + Shift + R on the keyboard.
Zoom Selector
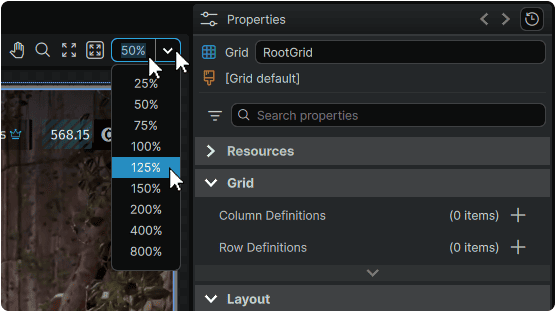
The Zoom Selector allows picking a custom zoom level to display the 📘 Stage at in the viewport.
A custom zoom level can be selected by clicking it, and either:
- Selecting a preset zoom level from the dropdown
- Inputting a custom percentage into the Zoom Selector's input field.
Additional View Tools
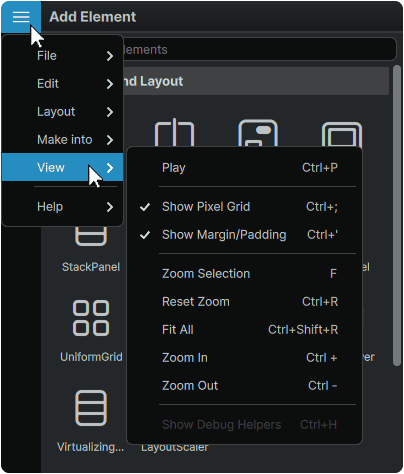
Further View options can also be found within the application's ≡ (Hamburger Menu), under the 'View' category:
Show Pixel Grid
Allows toggling the visibility of the Pixel Grid overlayed on the 📘 Stage when viewing a highly-magnified document.
The Pixel Grid can also be toggled by pressing Ctrl (Hold) + ; on the keyboard.
Show Margin/Padding
Allows toggling the visibility of the internal and external adorners on the 📘 Stage that display a visual representation of the Margin and Padding values set in a selected Element's 📘 Properties Panel.
The Margin/Padding adorners can also be toggled by pressing Ctrl (Hold) + ' on the keyboard.