


📘 Animation Timeline
🏘️ NoesisGUI ▸ 🏠 Noesis Studio ▸ 📘 Animation Timeline
Overview
The Animation Timeline serves as the primary tool within the visual editor to introduce motion graphics to Elements present on the 📘 Stage and in the 📘 Navigator Panel.
The Animation Timeline can be used to create or edit:
- 📘 Visual States, which use the Animation Timeline to easily set up various discrete Visual States of a Page, or Element Template, the animations that occur whilst each Visual State is active, and the animations transitioning from one Visual State to another.
- General-purpose animations called 📘 Storyboards, whose playback can be configured through 📘 Triggers by selecting the ControlStoryboardAction from the list of available 📘 Action Types.
Element Animation
Elements can be animated within a Timeline by making changes to their Property values at the currently-set Playhead position, either through the 📘 Properties Panel, or directly on-Stage through a wide range of visual manipulation options available in the 📘 Toolbox.
Timeline Events
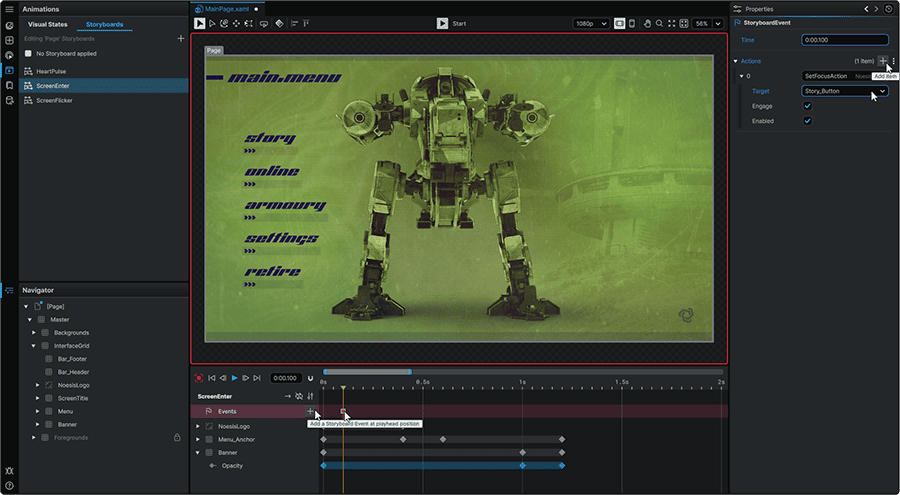
Timeline Events allow for creators to key any number of 📘 Actions directly into the chronology of the Timeline by 📑 Adding Event Keyframes, allowing for Actions to fire off at specific ■ (Event Keyframe) intervals along a currently-played time-sequence.
Timeline Zones
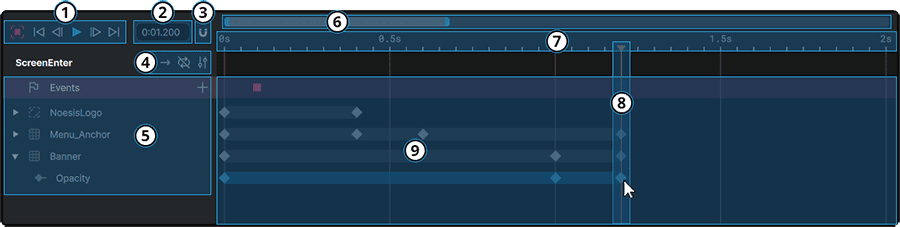
① Timeline Controls
The Timeline Controls allow the following actions:
- Record allows toggling 'Recording Mode', which when active, automatically creates a Keyframe at the current Playhead position in 📑 Keyframe Graph of any change to an Element's Property values. Whilst 'Recording', Keyframes can either be created by changing a value in the Element's 📘 Properties Panel, or as a result of any Element manipulation made on the 📘 Stage using any of the available 📘 Toolbox tools.
- Go To Start / Go To End allows moving the 📑 Playhead to very first frame of the Timeline, or the very last frame of the Animation respectively.
- Step Backward / Step Forward allows the 📑 Playhead to move left or right by one single unit following the snapping interval set in the Timeline's 📑 Snapping Options.
- Play / Pause allows the toggling 'Timeline Play Mode' which allows the selected Timeline to be played in isolation on the 📘 Stage, and following the settings configured in its 📑 Timeline Options.
② Time Indicator
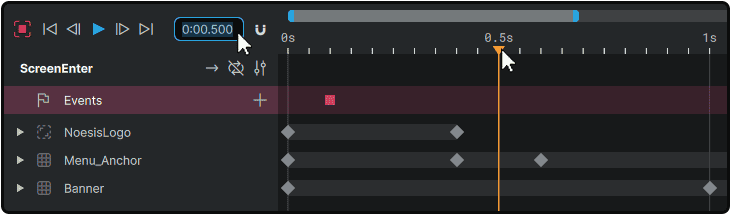
The Time Indicator displays the time at the current 📑 Playhead position.
The current time at which the Playhead sits in the Timeline can be set by clicking-and-dragging the Playhead itself left or right within the 📑 Time Chart, clicking-and-dragging left or right over the Time Indicator field, or clicking the Time Indicator field and inputting a new time value.
Manipulating the time via the Time Indicator's input field using either method ignores the intervals set in the Timeline's 📑 Snapping Options.
③ Snapping Options
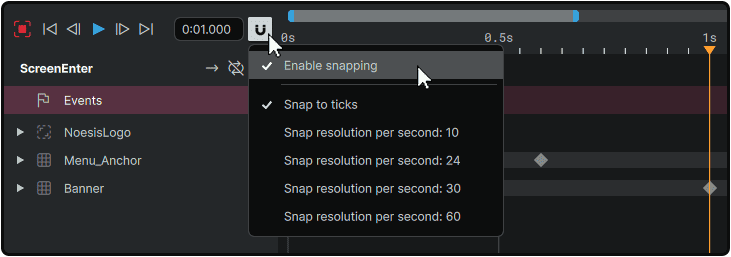
Snapping, when 'enabled', restricts the 📑 Playhead and Keyframes, to be placed at specific, pre-determined time intervals. During the animation workflow, this enforces Keyframes being placed at round numbers matching those of the chosen Snapping Interval.
If Snapping is enabled; the default Snap To Ticks option allows setting the intervals of each Playhead snap point to correspond to the ticks visible in the Timeline Chart, based on the level of Timeline Zoom. The higher the Timeline Zoom, the lower the interval between each 'snap'.
If Snapping is enabled; the Snap Resolution per Second options allows setting intervals at which the Playhead can be placed to create Keyframes can be set between: 10 per second, 24 per second, 30 per second, or 60 per second.
④ Timeline Options
The Timeline Options include the following:
- AutoReverse allows toggling between the animation playing once forward to the end (AutoReverse 'Off'), and the Timeline playing forward once to the end, then backwards once (AutoReverse 'On').
- Repeat Forever allows the animation to loop over and over again for as long as the Timeline is active.
- Settings allows for the entire suite of Timeline Settings to be fine-tuned in the 📘 Properties Panel.
⑤ Timeline Navigator
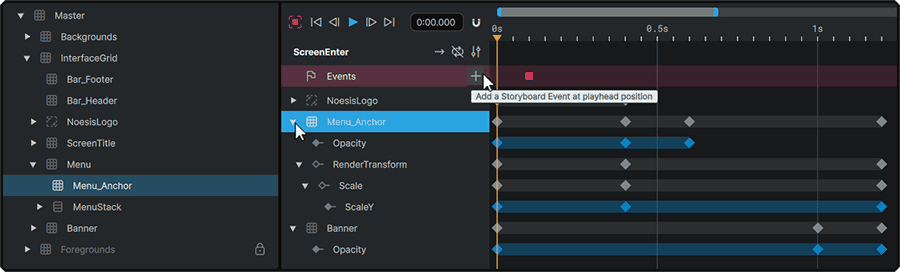
The Timeline Navigator displays a representation of the sub-set of Elements in the 📘 Navigator Panel that contain keyed Property values in the current Timeline.
The 🞂 (Expand) icon can be clicked on any Element present in the hierarchy to view the specific Properties keyed along the Timeline.
Clicking any Element in the Timeline Navigator, will also select it in the 📘 Navigator Panel and expose its 📘 Properties Panel.
The 'Events' section at the top of the Navigator additionally features a + (Add Event) action that can be used to add 📑 Timeline Events into the 📑 Keyframe Graph at the current 📑 Playhead position.
⑥ Timeline Zoom
The Timeline Zoom allows the 📑 Keyframe Graph to be zoomed in and out to display higher, or lower levels of detail within the chronology of a Timeline.
Either end of the Timeline Zoom bar can be clicked-and-dragged to set the time-frame to be shown on the Keyframe Graph.
The center of the Timeline Zoom bar can be clicked-and-dragged to change which section of the Timeline is visible within the Keyframe Graph's viewport.
⑦ Time Chart
The Time Chart displays a readout of the time elapsed throughout the Timeline, in seconds.
Clicking anywhere on the Time Chart will immediately move the 📑 Playhead to the position under the cursor closest to the interval set in the Timeline's 📑 Snapping Options.
Alternately, the 📑 Playhead can be cliicked-and-dragged to any desired timestamp, whilst still adhering to the interval set in the Timeline's Timeline's 📑 Snapping Options.
⑧ Playhead
The Playhead represents the current time-position within the Timeline.
When an Element has a Property value changed via its 📘 Properties Panel, or as a result of any Element manipulation made on the 📘 Stage performed with 📘 Toolbox tools, the value is keyed at the Playhead's position at the time the value was edited.
The position of the Playhead within the Timeline also dictates what is rendered on the 📘 Stage, in accordance with the Keyframe values at that point in time.
⑨ Keyframe Graph
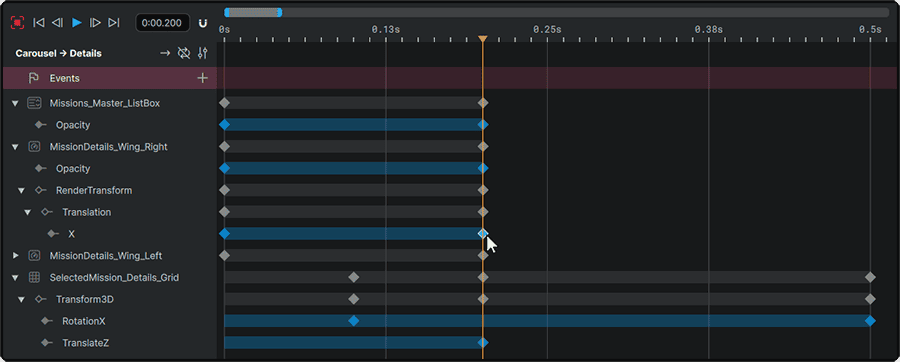
The Keyframe Graph offers a chronological display of all Element Property values keyed in the Timeline, as well as any Timeline Events present across it.
In addition to the ability to view all Keyframes in a selected Timeline, it also allows a wide range of 📑 Keyframe Operations to be performed, allowing a Timeline's animation to be efficiently modified at any time.
Keyframe Operations
A variety of tools exist to completely customize the contents of any Timeline animation:
Adding Property Keyframes
Element Property Keyframes can be added by selecing one or many Elements on the 📘 Stage, the 📘 Navigator Panel, or the 📑 Timeline Navigator, then either:
- On the Stage, modifying the Element using the 📘 Toolbox tools.
- In the Properties Panel, changing the values of any of the Element's Properties.
- In the Properties Panel, in a Property's 📘 ⋮ (3-Dot) Menu Functions, selecting the 'Create Keyframe' action to create a Keyframe of the Property's current value at the current 📑 Playhead position.
Adding Event Keyframes
Event Keyframes can be created by moving the 📑 Playhead to the desired time within the Timeline, the pressing the + (Add Event) action found in the 'Events' section in the 📑 Timeline Navigator.
The Actions that fire off when each ■ (Event Keyframe) is encountered can then be configured through the same methods as used to configure a Trigger's 📘 Actions.
Deleting Keyframes
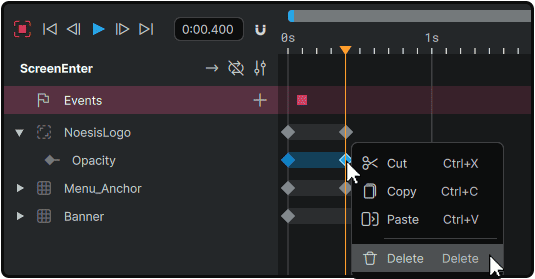
Keyframes can be deleted from the Timeline by selecting the ◆ (Property Keyframe) or ■ (Event Keyframe), and either right-clicking on it, and selecting '🗑 Delete', or by simply pressing Del on the keyboard with a Keyframe selected.
Removing a Keyframe originally placed between two other Keyframes, will result in the two remaiining Keyframes to interpolate between eachother, provided an interpolation is selected for the destination Keyframe in its 📑 Keyframe Properties
Cutting, Copying, and Pasting Keyframes
Keyframes on the Timeline can be Cut (Copied and Removed) or Copied (Copied and Retained) by selecting a ◆ (Property Keyframe) or a ■ (Event Keyframe) on the Timeline, and either right-clicking on it, and selecting 'Cut' or 'Copy', or by simply pressing Ctrl + X or Ctrl + C respestively whilst a Keyframe is selected.
Any Keyframe copied into the clipboard via the 'Cut' or 'Copy' actions, can then be pasted at the 📑 Playhead position by first selecting the Element to apply the 'Paste' to, then right-clicking anywhere in the 📑 Keyframe Graph, and selecting 'Paste' in the context menu, or by simply pressing Ctrl + V with the Timeline focused.
Moving Keyframes
The position of a Keyframe in the 📑 Keyframe Graph can be freely moved to any new timestamp by simply clicking-and-dragging its ◆ (Property Keyframe) or ■ (Event Keyframe) to the newly-desired position along the Timeline.
The intervals used to 'snap' the chronological position of each moved Keyframe along the Timeline follow the snapping interval set in the Timeline's 📑 Snapping Options.
Keyframe Properties
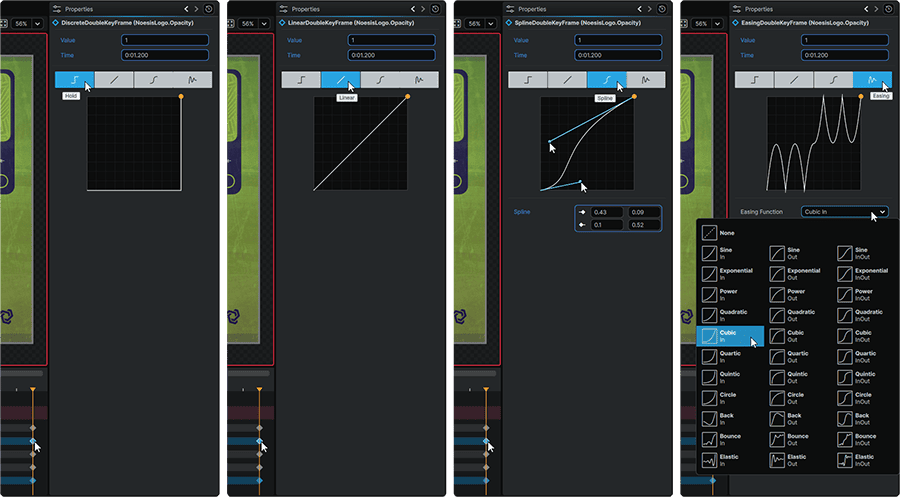
Selecting any Property Keyframe in the 📑 Keyframe Graph will reveal its Properties in the 📘 Properties Panel. From this location, interpolation to the selected Keyframe can be configured between:
- Hold: Allows all interpolation between Keyframes to be removed.
- Linear (Default): Allows a linear interpolation to be set between Keyframes.
- Spline: Allows the configuration of a custom interpolation curve between Keyframes.
- Easing: Allows to select from a library of interpolation presets.
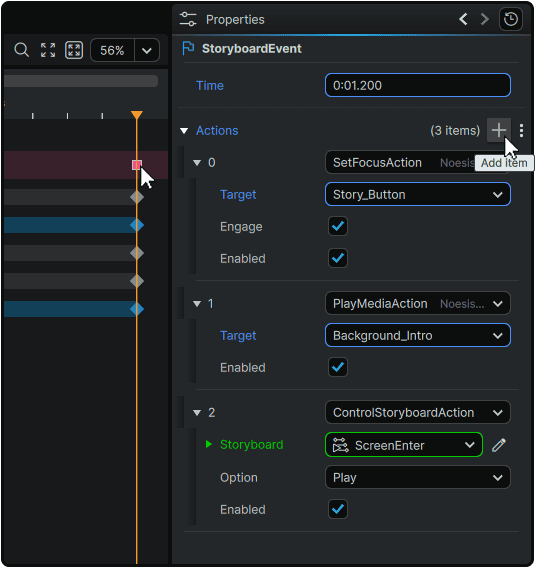
Selecting any Event Keyframe will reveal the Event's 📘 Properties Panel, from where 📘 Actions can be set up to fire off when the 📑 Playhead hits the Event's ■ (Event Keyframe) along the Timeline.
Multi-Selecting and Multi-Editing Keyframes
Multiple Keyframes can be selected at once, from where they can be deleted, cut, copied, moved, or have their 📑 Keyframe Properties all changed at once.
Keyframes can be multi-selected through the following methods:
- Holding Ctrl or Shift and clicking on multiple Keyframes in the 📑 Keyframe Graph.
- Clicking-and-dragging the mouse within the 📑 Keyframe Graph will make the Keyframe Selection Marquee appear. Any Keyframes the Marquee is dragged over will be included in the multi-selection once the click is released.
Deselecting Keyframes
Any Keyframe selected can be deselected through either of the following methods:
- Clicking in any empty area of the 📑 Keyframe Graph.
- Pressing the Esc key on the keyboard.
Universal Panels
- 📘 Navigator Panel
- 📘 Properties Panel
- 📘 Toolbox
- 📘 Stage Preview Toolbar
- 📘 View Toolbar
- 📘 Animation Timeline
📍 On this page