📘 Path Animation
🏘️ NoesisGUI ▸ 🏠 Noesis Studio ▸ 📘 Working With Paths ▸ 📘 Path Animation
Overview
In addition to native 📘Path Creation and Manipulation, Noesis Studio also includes the ability to animate Paths within States or Storyboards through the 📘 Animation Panel.
Animation Methods
To animate a Path, navigate to the 📘 Animation Panel within the desired scope of the animation, and create (or edit) a State, or Storyboard.
This will bring up the 📘 Animation Timeline, and will allow Paths, and Path Points to be animated across keyframes via either 📑 Animating a Path Visually, and/or 📑 Animating a Path via the Properties Panel.
Animating a Path Visually
Paths as a whole can be manipulated by equipping the Selection Tool either by selecting it from the Toolbox, or through the V shortcut. With the Selection Tool equipped, the Path can then be clicked to expose its adorners, which can be clicked to allow modification of its size and position.
Path Points can be manipulated by arming the Path Selection tool either by clicking on it from the Toolbox, or through the A shortcut. Individual anchor points throughout the Path can then be clicked, and dragged into different positions.
As long as the animation is open, and in recoding mode, any changes made using the Path adorners, or any positional edits of the Path Points using the Path Selection tool will result in the change being keyed at the currently-set playhead position.
To undo a change made in the animation, either utilising the undo function (Ctrl (Hold) + Z) until the change is reverted, or, delete the keyframe from the timeline which contains the undesired modification by either right-clicking on the keyframe and selecting 'Delete' from the context menu, or by clicking on the keyframe, and hitting the Del shortcut.
Path Points can be added, or removed by selecting the Path tool either by clicking on it from the Toolbox, or through the P shortcut.
Any Path Points added from the timeline will be added to the Path, and display in the chosen position on all frames, unless manually changed after the addition is made.
In the case of a removal of an anchor point from the timeline, the point will be removed from all frames, and if the point was linking two segments, they will automatically reconnect without the anchor point in between them.
Animating a Path via the Properties Panel
The properties of a Path as a whole can be manipulated by equipping the Selection tool either by clicking on it from the 📘 Toolbox, or through the V shortcut. With the Selection tool active, the Path can then either be clicked on the 📘 Stage or in the 📘 Navigator Panel to select it, and expose its Properties, which can then be modified. Any change in value of a Property will be automatically keyed at the playhead's current position, as long as the timeline is in 'recording' mode. (Recording mode is automatically activated when first clicking on a State or a Storyboard)
The properties of an individual Path Point can also similarly be manipulated via the 📘 Properties Panel by selecting the Path Selection tool either by clicking on it from the 📘 Toolbox, or through the A shortcut. With the Path Selection tool equipped, individual anchor points throughout the Path can be clicked to expose their individual properties, where they can be edited. Any change in value whilst 'recording' mode is activated will be automatically keyed at the playhead's current position.
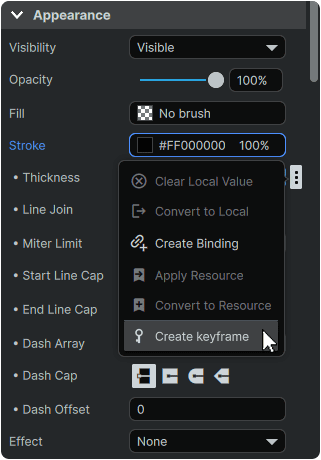
To set a keyframe without necesarily modifying the original value of a Path Property, it is also possible to key Property changes by hovering over any Property, clicking on its ⋮ (3-Dot) menu icon, and selecting 'Create Keyframe' from the context menu. This will key the Property's value in the timeline, at the playhead's current position.