📘 Path Import Features
🏘️ NoesisGUI ▸ 🏠 Noesis Studio ▸ 📘 Working With Paths ▸ 📘 Path Import Features
Overview
In addition to offering native in-application 📘 Path Creation and Manipulation, Noesis Studio is also capable of importing vector graphics in the Scalable Vector Graphics ('SVG') format generated in an external vector graphics application, such as Figma, Illustrator, Affinity Designer, and many others. Behind-the-scenes, SVG imports are converted into 📘 GeometryData for seamless integration into XAML framework.
Importing vector graphics from an external editor into Noesis Studio can be performed by 📑 Importing Paths From The Clipboard or 📑 Importing From An SVG File.
Note
Only vector data is processed during import. Non-outlined text, bitmaps, and effects are not included when brought over to Studio.
Importing Paths From The Clipboard
Copying Paths from Figma
Vector graphics can be copied directly from Figma by right-clicking on the vector graphic from either the Canvas or the Layers Panel, navigating to the 'Copy/Paste as' context menu option, and selecting 'Copy as SVG'. This will place the vector graphic into the clipboard, from where it can be pasted.

For original layer names to be included when copying to the clipboard, the vector graphic must first be selected from either the Canvas or the Layers panel, followed by navigating to the 'Design' panel on the far-right of the application window. Then, under the 'Export' category, the + (Add Export) icon can then be clicked. In the created entry, 'SVG' should be selected from the file format dropdown, followed by opening the ⋮ (3-Dot) menu, and enabling the 'Include "ID" attribute' option. The graphic can then be copy-pasted using the method above.

Learn about 📑 Pasting Paths Into Noesis Studio
Copying Paths from Adobe Illustrator
Note
Adobe Illustrator has the feature to export to the clipboard in the SVG format as disabled by default. It therefore needs to first be manually enabled before content can be copy-pasted into Studio.
The ability to export copied vector content in the SVG format must first be enabled by navigating to Adobe Illustrator's settings using Ctrl (Hold) + K (or by expanding the "Edit" menu, under "Preferences"), and verifying that under the 'Clipboard Handling' category, under the 'On Copy:', that the 'Include SVG Code' option is enabled.
Once the "Include SVG Code" setting is confirmed to be enabled, the Preferences window can be closed, to return to the Illustrator document.
Vector graphics can then be copied from either the Page or Layers panel by clicking the vector shape and using Ctrl (Hold) + C (or the 'Copy' context menu function) . This will place the vector graphic into the clipboard, from where it can be pasted.

Learn about 📑 Pasting Paths Into Noesis Studio
Copying Paths from Affinity Designer
Vector graphics can be copied directly from Affinity Designer by selecting the vector artwork from either the Canvas or the Layers Panel, then using the Ctrl (Hold) + C keyboard shortcut (or the 'Copy' context menu function). This will place the vector graphic into the clipboard, from where it can be pasted.

Learn about 📑 Pasting Paths Into Noesis Studio
Copying Paths from Adobe Photoshop
Vector graphics can be copied directly from Adobe Photoshop by right-clicking the vector shape in the Layers Panel, and selecting 'Copy as SVG' from the context menu. This will place the vector graphic into the clipboard, from where it can be pasted.

Learn about 📑 Pasting Paths Into Noesis Studio
Note
It is important to note that in Photoshop, copying multiple shapes at once is not supported. To import multiple shapes, they must either be 'combined' in Photoshop, or brought into Studio individually.
Copying Paths from Affinity Photo and Affinity Publisher
Note
Both Affinity Photo and Affinity Publisher have the feature to export to the clipboard in the SVG format as disabled by default. It therefore needs to first be manually enabled before content can be copy-pasted into Studio.
The ability to export copied vector content in the SVG format must first be enabled by navigating to Affinity Photo's and/or Affinity Publisher's settings using Ctrl (Hold) + , (or by expanding the "Edit" menu, and selecting "Settings"), and verifying that under the 'General' tab, under the 'Other' category, that the 'Copy Items as SVG' option is enabled.
Once the "Copy Items as SVG" setting is confirmed to be enabled, the Settings window can be closed, to return to the Photo or Publisher document.
Vector graphics can then be copied from either the Page or Layers panel by clicking the vector shape and using Ctrl (Hold) + C (or the 'Copy' context menu function) . This will place the vector graphic into the clipboard, from where it can be pasted.

Learn about 📑 Pasting Paths Into Noesis Studio
Copying Paths from Sketch
Vector graphics can be copied directly from Sketch by right-clicking on the vector graphic from either the Canvas or the Layers Panel, and selecting 'Copy SVG Code' from the context menu. This will place the vector graphic into the clipboard, from where it can be pasted.

Learn about 📑 Pasting Paths Into Noesis Studio
Pasting Paths Into Noesis Studio
Once the artwork has been copied to the clipboard from the applications above, the vector graphic can be pasted by selecting the destination layer in the 📘 Navigator Panel, or by selecting the Element on the 📘 Stage in which the SVG should be pasted into.
Ctrl (Hold) + V can then be used to paste the vector graphic into the destination layer.
Alternately, the destination layer in the 📘 Navigator Panel or on the 📘 Stage can be right-clicked to open its context menu, from where under the 'Edit' submenu, the 'Paste' function can be selected.
A successful import will result in the copied vector graphic being pasted inside of an automatically-generated 📘 Canvas Element within the destination layer.
Importing From An SVG File
Vector files can also be imported into Studio from a standalone SVG file located on your machine.
Note
Unlike many other external Asset types supported by Studio, SVG Assets do not appear within the 📘 Assets Panel, and are not dynamically-linked. This means that after importing from an SVG file, if any changes are made to the source file, it will have to be re-imported, and potentially re-configured to update within the project.
Exporting SVGs from Figma
SVGs can be exported from Figma by selecting the vector graphic from either the Canvas or the Layers panel, then navigating to the 'Design' panel on the far-right of the application window.
Then, under the 'Export' category, the + (Add Export) icon can then be clicked to create a new exportable asset which will offer a range of options. In this new entry, 'SVG' should be selected from the file format dropdown before clicking 'Export [Vector Layer Name]' to save the file.
For original layer names to be included in the SVG export, the 'Include "ID" attribute' option needs to additionally be enabled from the ⋮ (3-Dot) menu prior to exporting.
Learn about 📑 Importing SVGs Into Noesis Studio
Exporting SVGs from Adobe Illustrator
SVGs can be exported from Adobe Illustrator by expanding the 'File' menu of a document containing vector artwork, navigating to 'Export As', selecting 'SVG' under 'Save as type' then clicking 'Export'.
In the SVG options, the 'Styling' should then be set to 'Presenation Attributes' before pressing 'OK' to save the file.

Learn about 📑 Importing SVGs Into Noesis Studio
Exporting SVGs from Adobe Photoshop
Note
Adobe Photoshop has the feature to export in the SVG format as disabled by default. It therefore needs to first be manually enabled before it can be used.
The ability to export vector content in the SVG format must first be enabled by navigating to Photoshop's Preferences menu. This can be accessed by pressing Ctrl (Hold) + K and navigating to the 'Export' tab. Alternately, the Preferences window can be accessed by expanding the "Edit" menu, hovering over 'Preferences', and selecting the 'Export...' option.
Once within the Export preferences, under the 'Options' category, the option to 'Use legacy "Export As"' should be enabled. With the setting enabled, SVGs can be exported from Photoshop.

Once this option has been verified as active, the Preferences window can be closed, to return to the document containing the vector artwork.
The 'Export As' window can then be opened either by pressing Alt (Hold) + Shift (Hold) + Ctrl (Hold) + W, or by navigating to the 'File' menu, hovering over 'Export', and selecting 'Export As...'.
In the 'Export As' window, the SVG format can then be selected from the 'Format' dropdown menu, before clicking 'Export' to save the file.

Learn about 📑 Importing SVGs Into Noesis Studio
Exporting SVGs from Affinity Designer, Affinity Photo, and Affinity Publisher

SVGs can be exported from Affinity Designer, Affinity Photo, and Affinity Publisher by expanding the 'File' menu of a document containing vector artwork and selecting 'Export'
In the Export window, 'SVG' should then be selected from the file format dropdown, and 'SVG (for export)' should be selected from the Preset dropdown, before clicking 'Export' to save the file.
Learn about 📑 Importing SVGs Into Noesis Studio
Exporting SVGs from Sketch

SVGs can be exported from Sketch by selecting the desired vector graphic, navigating to the 'Export' section of the Inspector, setting the Export format as 'SVG', before clicking 'Export SVG Design' to save the file.
Learn more about ↗️ Exporting Assets from Sketch or learn about 📑 Importing SVGs Into Noesis Studio.
Importing SVGs into Noesis Studio
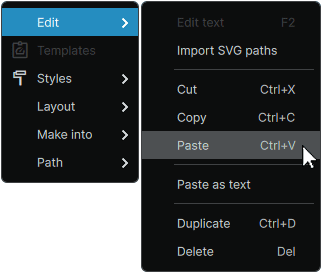
SVGs can be imported into Noesis Studio by right-clicking on any compatible Element, navigating to the 'Edit' context menu option, and selecting 'Import SVG', before selecting the desired SVG file within the operating system file explorer.

Note
Elements of the following classes are compatible with serving as the parent Element of an SVG: ↗️ Decorator, ↗️ Viewbox, ↗️ ContentControl, or ↗️ Panel.
A successful import will result in the chosen SVG being pasted inside of an automatically-generated Canvas Element within the chosen destination Element.
Learn more about the 📘 Canvas Element
Note
The SVG file selected for this operation is only used to copy the data from it, and the original source file itself is not brought into the Studio project. Because of this, any changes to the original SVG file will not update in the Noesis project.
Feature Import Compatibility
The following table outlines supported features when importing graphics from a range of vector editors.
Note
In cases where certain features are supported from one application, but not in another, it is due to limitations of individual external vector editor, rather than Studio's own import capabilities.
Basic Vector Shapes
The ability to render primitive and custom shapes drawn with either built-in shape tools, or hand-drawn with the pen tool.
|
Figma: ✅ Clipboard, ✅ SVG File
Adobe Illustrator: ✅ Clipboard, ✅ SVG File
Adobe Photoshop: ✅ Clipboard, ✅ SVG File
Affinity Designer ✅ Clipboard, ✅ SVG File
Affinity Photo, Affinity Publisher: ✅ Clipboard, ✅ SVG File
Sketch: ❓Clipboard, ❓SVG File
Inkscape: ❌ Clipboard, ✅ SVG File
|
Rounded Corners
The ability to render shape corners that have been dynamically rounded to a specific radius.
|
✅ Universally Supported¹
¹ Rounded corners are imported as drawn curves and do not retain 'live' corner radius features.
|
Basic Strokes
The ability to render basic strokes applied to either an 'open' path, or a closed shape.
|
✅ Universally Supported
|
Advanced Strokes
The ability to render strokes containing advanced decorations such as dashed lines, Path Point heads, and custom Path profiles.
|
Figma: ✅ Clipboard¹, ✅ SVG File¹
Adobe Illustrator: ✅ Clipboard¹, ✅ SVG File¹
Adobe Photoshop: ✅ Clipboard¹, ✅ SVG File¹
Affinity Designer ✅ Clipboard², ✅ SVG File²
Affinity Photo, Affinity Publisher: ✅ Clipboard², ✅ SVG File²
Sketch: ❓Clipboard, ❓SVG File
Inkscape: ❌ Clipboard, ✅ SVG File¹
¹ Segments that contain only dash customization are able to benefit from continued 'live editing' of the segment's properties after being imported into Studio. However, if a segment contains Path Point heads or custom Path profiles, both these advanced attributes, as well the dashes will be imported as pre-drawn PathFigures without retaining their 'live editing' features.
² All advanced Stroke features are imported as pre-drawn PathFigures and do not retain their 'live editing' features.
|
Solid Colors
The ability to retain the original flat colors applied to shapes within the external vector editor.
|
✅ Universally Supported
|
Linear Gradients
The ability to render linear gradients composed of multiple colors and multiple opacity stops.
|
Figma: ✅ Clipboard, ✅ SVG File
Adobe Illustrator: ✅ Clipboard, ✅ SVG File
Adobe Photoshop: ✅ Clipboard, ✅ SVG File
Affinity Designer ✅ Clipboard, ✅ SVG File
Affinity Photo, Affinity Publisher: ✅ Clipboard, ✅ SVG File
Sketch: ❓Clipboard, ❓SVG File
Inkscape: ❌ Clipboard, ✅ SVG File
|
Radial Gradients
The ability to render radial gradients composed of multiple colors and multiple opacity stops.
|
Figma: ✅ Clipboard, ✅ SVG File
Adobe Illustrator: ✅ Clipboard, ✅ SVG File
Adobe Photoshop: ✅ Clipboard, ✅ SVG File
Affinity Designer ✅ Clipboard, ✅ SVG File
Affinity Photo, Affinity Publisher: ✅ Clipboard, ✅ SVG File
Sketch: ❓Clipboard, ❓SVG File
Inkscape: ❌ Clipboard, ✅ SVG File
|
Special Gradients
The ability to render special gradients composed of multiple colors and multiple opacity stops, such as Freeform, Angular, Diamond, Reflected, and Conical gradients.
|
❌ Not Supported
|
Bitmap Elements
The ability to render the bitmap elements of an SVG including raster imagery, raster effects, and raster patterns, among others.
|
❌ Not Supported
|
Vector Patterns
The ability to render patterns composed of repeating vector graphics.
|
❌ Not Supported
|
Layer Order
The ability to retain the orignal visual ordering of Paths created within the external vector editor.
|
Figma: ✅ Clipboard, ✅ SVG File
Adobe Illustrator: ✅ Clipboard, ✅ SVG File
Adobe Photoshop: ❌ Clipboard¹, ✅ SVG File
Affinity Designer ✅ Clipboard, ✅ SVG File
Affinity Photo, Affinity Publisher: ✅ Clipboard, ✅ SVG File
Sketch: ❓Clipboard, ❓SVG File
Inkscape: ❌ Clipboard, ✅ SVG File
¹ External vector editor does not support exporting multiple Paths.
|
Layer Names
The ability to retain the orignal layer names created within the external vector editor.
|
Figma: ✅ Clipboard, ✅ SVG File
Adobe Illustrator: ✅ Clipboard, ✅ SVG File
Adobe Photoshop: ❌ Clipboard¹, ✅ SVG File
Affinity Designer ✅ Clipboard, ✅ SVG File
Affinity Photo, Affinity Publisher: ✅ Clipboard, ✅ SVG File
Sketch: ❓Clipboard, ❓SVG File
Inkscape: ❌ Clipboard, ❌ SVG File¹
¹ External vector editor does not support conservation of layer names.
|
Layer Groups
The ability to retain the original layer groups created within the external vector editor.
|
❌ Not Supported
|
Compound Paths
The ability to render imports containing multiple Paths that have been intersected between each other.
|
Figma: ✅ Clipboard¹, ✅ SVG File¹
Adobe Illustrator: ✅ Clipboard¹, ✅ SVG File¹
Adobe Photoshop: ✅ Clipboard¹, ✅ SVG File¹
Affinity Designer ✅ Clipboard¹, ✅ SVG File¹
Affinity Photo, Affinity Publisher: ✅ Clipboard¹, ✅ SVG File¹
Sketch: ❓Clipboard, ❓SVG File
Inkscape: ❌ Clipboard, ✅ SVG File
¹ Compound Paths are imported as a single Path, rather than as separate Paths as it may have been presented in the external vector editor.
|
Clipping Paths
The ability to render paths which are 'masked' by the shape of another path.
|
❌ Not Supported
|
Fonts
The ability to render fonts that are not first converted to outlines.
|
❌ Not Supported
|
Working With Paths
- 📘 Path Introduction
- 📘 Path Import Features
- 📘 Path Creation and Manipulation
- 📘 Path Management
- 📘 Path Properties
- 📘 Path Animation