📘 Path Creation and Manipulation
🏘️ NoesisGUI ▸ 🏠 Noesis Studio ▸ 📘 Working With Paths ▸ 📘 Path Creation and Manipulation
Overview
Vector graphics can be directly created and modified within Noesis Studio by 📑 Drawing Paths by hand, by 📑 Manipulating Paths that already exist, or by 📑 Using Primitive Shapes as a starting point.
Drawing Paths
Activating the Path Tool
To start drawing a custom shape, the Path Tool can either be selected from the 📘 Toolbox, or by pressing P.
Placing a Path Point
With the Path Tool equipped, clicking anywhere on the 📘 Stage will place the first Path Point of a Path within the clicked Element on-Stage (if the Element is able to house a Path.)
If the selected layer is a Path, the new drawing will be created as an additional PathFigure within the existing Path.
Completing a Path Segment
With the Path Tool equipped, and without deselecting the first Path Point, a Path Segment can be drawn by clicking anywhere on 📘 Stage to add a second Path Point, which will link the first Path Point to the second in a straight line.
Holding Shift during this operation will constrain the angle of the Path Segment to increments of 45°.
Curving Path Segments
Clicking-and-dragging in any direction when placing a Path Point, will curve the Path Segment instead of drawing a straight line. This will create a Bézier curve which can be customized at any time.
Completing a Drawing
Pressing Esc after only one anchor point is placed will cancel the drawing operation, and remove the anchor point.
Pressing Enter after the first anchor point is placed, will cancel the drawing operation, but conserve the anchor point. This anchor point can be reselected at any time with the Path Tool to continue drawing from it.
Pressing Enter, Esc, or clicking anywhere off of the Stage during the drawing process allows a Path with a minimum of two anchor points to be left 'open'.
Anchor points of 'open' paths can be reselected at any time with the Path tool, to either continue drawing from them, to close the shape, or to join them to another open shape within their common Path.
Enclosing Paths
With either the first-created, or the last-created anchor point of a Path selected, and the Path Tool active, a Path can be made into a fully enclosed shape by clicking on the other anchor point not yet connected to two Path Segments.
Extending a Path by Adding Additional Path Points
With either the first, or the last anchor point of a Path selected, additional anchor points an be added to a Path by continuing to click on empty areas of the Stage with the Path Tool.
Adding Additional Path Points Within a Path
With the Path Tool selected, additional anchor points can be added to a Path by clicking along an existing Path Segment. The new Path Point will be added where the click is made.
Manipulating Paths
Activating the Path Selection Tool
To start editing Paths, the Path Selection Tool can either be selected from the 📘 Toolbox, or by pressing A.
Modifying Path Points
With the Path Selection Tool active, individual Path Points can be selected and modified.
Once one, or multiple Path Points have been selected, their position can be adjusted either clicking-and-dragging a Path Point, or by selecting a Path Point with the Path Selection Tool and using ArrowKey (Up/Down/Left/Right) to reposition the Path Points in increments of 1px in any direction. Alternately, Shift (Hold) + ArrowKey (Up/Down/Left/Right) can be used to reposition Path Points in increments of 10px.
Holding Ctrl whilst clicking on a Path Point with the Path Selection active will convert a pointed intersection into a smooth curve. This can be reversed at any point by holding Ctrl and clicking on the Path Point once again.
When a Path Point has been made into a smooth curve, the Path Selection Tool can be used to modify the Path Point Handles angle, and distance away from the Path Point.
This can be performed by clicking-and-dragging a Path Point Handle with the Path Selection tool, or by selecting a Path Point with the Path Selection Tool and using ArrowKey (Up/Down/Left/Right) or Shift (Hold) + ArrowKey (Up/Down/Left/Right) to move the handle in any direction.
By default, the angle and length of each will be symmetrical, however, this can be overriden by holding Alt during the process of manipulating one of the Path Point handles.
Modifying Path Segments
With the Path Selection Tool active, individual Path Segments can be selected and modified.
Once a Path Segment has been selected by clicking it with the Path Selection Tool, its position can be adjusted either by clicking-and-dragging or by using ArrowKey (Up/Down/Left/Right) to reposition the Segement in increments of 1px in any direction. Alternately, Shift (Hold) + ArrowKey (Up/Down/Left/Right) to reposition a Segment in increments of 10px. Either of these methods will adjust the position of the two Path Points at each end of the Segment.
Holding Shift whilst adjusting the position of a Path Segment will constrain its movement to 45° increments.
Holding Ctrl whilst adjusting the position of a Path Segment will curve the segment. A curve can be removed from a Segment by holding Ctrl and clicking on the Segment.
Holding Ctrl and Shift simultaneously whilst adjusting the position of a path Segment will curve the Path Segment, and constrain its movement to the pixel-grid of the Page.
Path Operations
Activating the Selection Tool
To select Paths as a whole, the Selection Tool can either be selected from the 📘 Toolbox, or by pressing V.
With the Selection Tool equipped, Paths can then be selected either from the 📘 Stage directly, or from within the 📘 Navigator Panel.
Clipping Paths
A Path can be used to clip (or 'mask') another Path. This will result in their common area of intersection being rendered following the operation.
To clip one Path with another object or a parent of a group of objects, a Path and the object to be clipped must be multi-selected by equipping the Selection Tool (V) or the Path Selection Tool (A), pressing and holding Shift, clicking each Path either on the 📘 Stage or within the 📘 Navigator Panel, and then releasing Shift.
Without de-activating the selection, the Path to use as the clipping Mask can then be right-clicked, and can be set to clip another object by navigating to the context menu's 'Path' category, followed by selecting the 'Make clipping path' option.
Releasing Clipping Paths
Clipped Paths are able to be reversed back into individual Paths. This can be achieved by right-clicking on the Path, navigating to its context menu's 'Path' category, then selecting the 'Release clipping path' option.
This will separate the separate pieces back into individual Paths on the Stage, and remove the clipping that was originally applied.
Compounding Paths
To join multiple Paths together as a single Path, the individual Paths must be first multi-selected.
This can be achieved by holding Shift with the Selection Tool (V) or Path Selection Tool (A) equipped, then clicking on each Path either on 📘 Stage or within the 📘 Navigator Panel. Once each desired Path has been selected, Shift can then be released.
Without de-activating the selection, any of the selected shapes can then be right-clicked, and can be combined by navigating to its context menu's 'Path' category, followed by selecting the 'Make compound path' option.
By default, this operation will result in any overlapping Paths being intersected with eachother, with areas of non-overlap remaining 'solid', and any areas of overlap creating 'negatives' of eachother.
Additionally, compounding multiple Paths allows them to be physically joined into a single continuous shape by joining their open anchor points with the Path Tool (P).
Breaking Up Compound Paths
Compounded shapes are able to be reversed back into individual Paths. This can be achieved by right-clicking on the Path, navigating to the context menu's 'Path' category, then selecting the 'Release Compound Path' option.
This will separate the separate pieces back into individual Paths on the Stage.
Boolean Operations
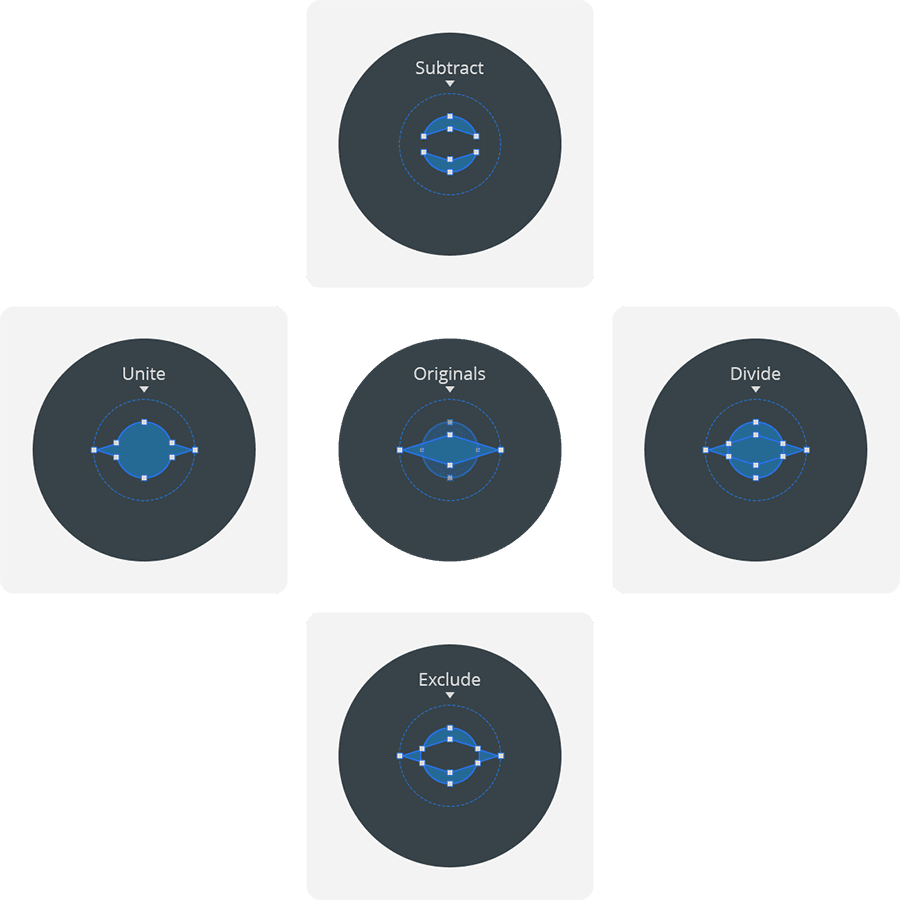
With Boolean Operations, Studio offers the ability to decide at a more granular level than through 📑 Compounding Paths how Paths will intersect when combined, from the following modes:
Unite: The areas of selected shapes are combined.
Subtract: The shape 'in-front' is subtracted from the shape 'behind'.
Intersect: Only the areas where shapes overlap eachother will be retained.
Divide: The boundaries of each shape will create 'cuts' into the other.
Exclude: Only the areas where shapes do not overlap eachother will be retained.
To apply Boolean Operations, the individual Paths must be first multi-selected by pressing and holding Shift, then clicking each Path to be intersected.
Without de-activating the selection, any of the selected shapes can then be right-clicked, then combined via its context menu's 'Path' category, followed by either selecting 'Unite', 'Subtract', 'Intersect', 'Divide', or 'Exclude'.

Note
The Path that is top-most visually (or 'bottom-most' in the Navigator hierarchy) serves as the 'master' in any Boolean Operation. In other words, the 'master' is what is 'United' with, 'Subtracted' with, 'Intersected' with, or 'Divided' against.
Path Transforms
A Path as a whole can have its appearance modified by selecting it, then either using the Transform Tool (Y), or by adjusting its 'Render Transform' properties in the 'Transform' section of the 📘 Properties Panel.

The available Transforms include:
Translate: Adjusts the Horizontal (X), and Vertical (Y) position of the Path relative to its Origin, measured in pixels.
Rotate Rotates the Path around the set Origin, measured in degrees between 0° (no rotation) and 360° (full rotation).
Scale: Grows or shrinks the Path around the set Origin, measured as a percentage between 0 (0%) and 1 (100%).
Skew: Angles the Path around the set Origin, measured in degrees between 0° and 360°.
Origin Sets the Origin point for the path, around which all other transforms will be centred around, measured percentages relative to the Path itself, between 0,0 (Top Left Corner), and 1,1 (bottom right corner). In this notation, an Origin placed directly in the center of the Path's bounding box would be written as '0.5, 0.5'
Although each of these Transform properties have a specific range, each has the ability to to set values beyond the 'natural range', allowing for values between -∞ and +∞ to be used.
This can be particularly useful when employed within animations, where for example, three full rotations of a Path could be achieved by keyframing a single timeline interpolating between 0° and 1080°, rather than keying three back-to-back animations each going between 0° and 360°.
Flattening Transforms
Any Path Transform can be 'flattened' by right-clicking a Path to access its context menu, navigating to the 'Path' category, and selecting 'Flatten transform'.
This will result in any transformations applied becoming the new 'base' for the Path.
For example, if a Path was drawn, rotated 90°, then flattened, it would result in the Rotation being applied and '0°'' becoming the new 'starting' Rotation value.
Note
Paths cannot 'unflattened' unless using the Undo (Ctrl+Z) system to go back to a point in time prior to the flattening being applied, or applying new Transform values which reset the Path to its original state. Therefore, flattening should be considered a permanent modification to a Path.
Using Primitive Shapes
In Studio, Paths can also be drawn by starting out with one of the included Primitive Shapes. These can either be used as-is, or can be converted to a Path.
Converting Primitive Shape to a Path exposes the shape's Path Points, and grants the ability to adjust the base shape further, such as modifying, adding, or removing Path Points to change the appearance of the shape.
Adding Primitive Shapes
A primitive shape to the current Page by navigating to the 'Shape' category of the 📘 Add Element Panel, and clicking-and-dragging the Primitive shape from the panel to either 📘 Stage, or to the 📘 Navigator Panel.
Alternately, a Primitive shape can be added to the current Page by clicking on the Shape in the 📘 Add Element Panel to select it, then clicking-and-dragging on the Stage to draw the shape out.
Converting Primitive Shapes to Paths
To convert a primitive shape to a Path, it can be right-clicked either on the 📘 Stage, or within the 📘 Navigator Panel, followed by navigating to its context menu's 'Path' category, and selecting 'Convert to Path'.
Note
Converting a Primitive Shape to a Path cannot be reversed and a Path cannot be converted back to a Primitive Shape.
Working With Paths
- 📘 Path Introduction
- 📘 Path Import Features
- 📘 Path Creation and Manipulation
- 📘 Path Management
- 📘 Path Properties
- 📘 Path Animation